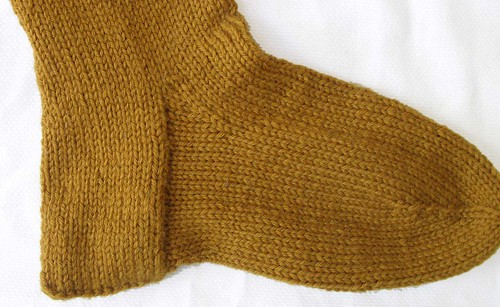
I created these instructions for a beginning stocking-knitter's workshop. These stockings are similar to the coarser, less aristocratic knitted stockings that were made in great quantities in northern Europe in the 16th century. They use a 16th-century type of heel that I think is easier to understand than more modern types of heels, which tend to ask you to do peculiar things with your knitting like stop in the middle of a row, turn around and go back the other way :) With this earlier type of heel, it's a lot easier to see how the stocking turns a 90-degree corner between the vertical leg and the horizontal foot parts.
First, I'll give you a very brief set of instructions for knitting a plain stocking — perhaps such instructions as might be passed down to you in a pre-literate society. Below will be more detailed instructions, for those of us who have not been knitting stockings since we were six years old.
Brief instructions
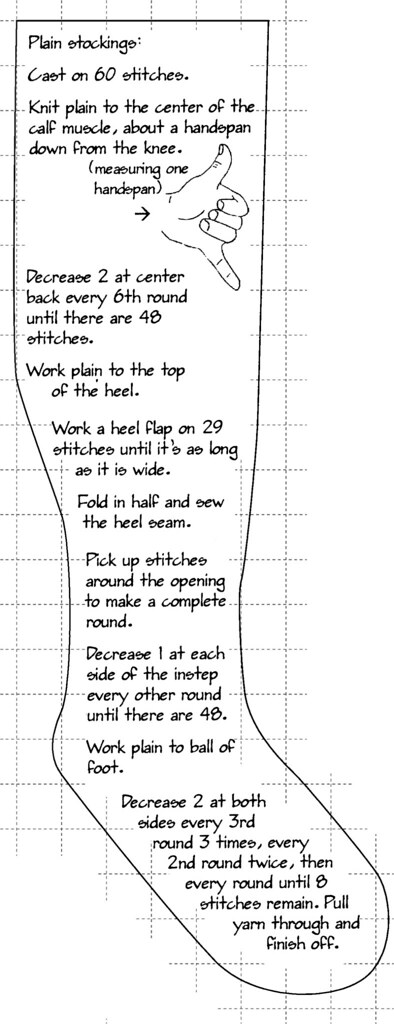
Cast on 60 stitches. Knit plain to the center of the calf muscle, about a handspan down from the knee. Decrease 2 at center back every 6th round until there are 48 stitches. Work plain to the top of the heel. Work a heel flap on 29 stitches until it is as long as it is wide. Fold in half and sew the heel seam. Pick up stitches around the opening to make a complete round. Decrease 1 at each side of the instep every 2nd round until there are 48 stitches again. Work plain to the ball of the foot. Decrease 2 stitches every 3rd round 3 times, every 2nd round twice, then every round until there are 10 or fewer stitches left. Draw thread through remaining stitches, pull tight, and finish off.
More detailed instructions
These instructions produce a slightly longer than knee-length stocking like the diagram (to enlarge: 1 square = 1 inch). This fits an average-sized woman’s foot and leg. If you are not average, you may need to experiment with fewer or more stitches, shorter or longer length. The instructions will often tell you to “stop and try on your sock,” and you can do so either by trying the stocking on your own foot, or if the diagram is the right size for you, by flattening your knitted piece and laying it on top of the diagram.
What’s important is that your stockings fit YOU. Don’t be afraid to rip out a couple of inches and re-do them if necessary: once you get the right measurements, write them down, and you can use them to make as many socks as you like in the future.
Note that these stockings should extend an inch or two above the knee. They have no ribbing, so they are held up with tied garters, held by a turned-down cuff. These approximate a coarse period stocking for roughly the late 13th through the 17th century.
Have courage, and begin!
Materials
500-550 yards wool yarn, ordinary worsted weight (about 10–12 wraps per inch)
A set of 4 or 5 double pointed needles, U.S. size 5, 6 or 7 — whatever gets you a knitted gauge of 5+1/2 stitches per inch.
Instructions for the leg
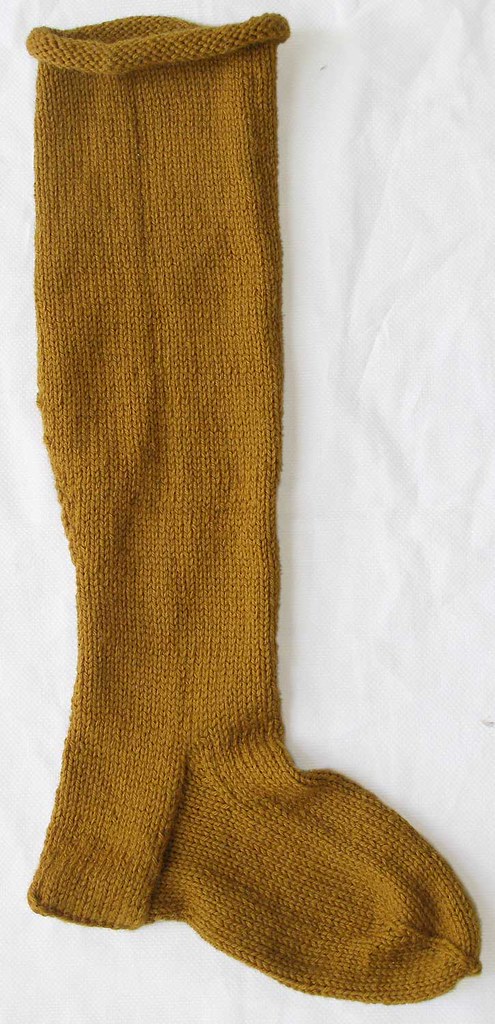
Beginning at the top of the leg, cast on 60 stitches and join into a circle. Knit plain (i.e. every stitch is a knit stitch).
Knit around plain for about one inch. Stop and try your sock on to see whether this fits over the widest part of your calf comfortably. It should feel a little stretchy but not at all tight. If it’s too tight, try the same thing but with 64 stitches, or experiment till you have the right number. If it’s loose or baggy, try fewer stitches.
(If you are not pre-literate, doing a bit of math may help here: measure around the widest part of your calf, subtract one inch, and multiply by your stitch gauge to get an approximate number. Math can help with getting the right size for other parts of the sock, too. Don’t forget to write down what you did so you can duplicate it later.)
Knit plain for a total of 9 inches. (Putting a marker about every inch helps you track your progress, especially if you feel it’s taking forever to get there.) Try the sock on: this should bring you to about the point where your calf starts to narrow. Adjust length if needed, mark the center back of your sock, and begin the decreases as follows:
Decrease round: Knit 2 together with the two stitches before your marker. Knit 1 (the marked stitch). With the next two stitches, work a SKP decrease (slip 1, knit 1, pass slipped stitch over, or whatever your favorite method is for this).
Knit 5 rounds plain.
Repeat this, decreasing on every 6th round, until you have 48 stitches. Try the sock on and see if this fits your lower leg and ankle correctly.
If so, continue knitting plain until you reach the top of your heel. (To find the right spot, point your toe, and locate the crease at the back of your ankle.)
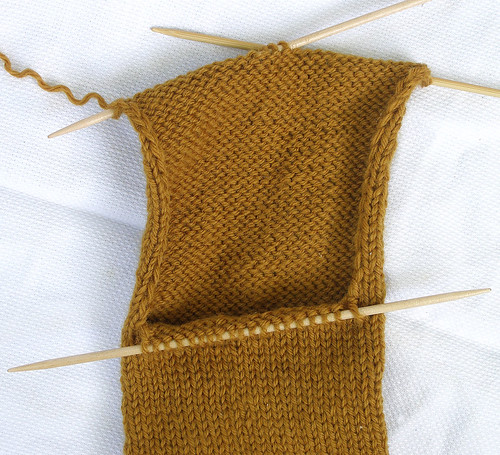
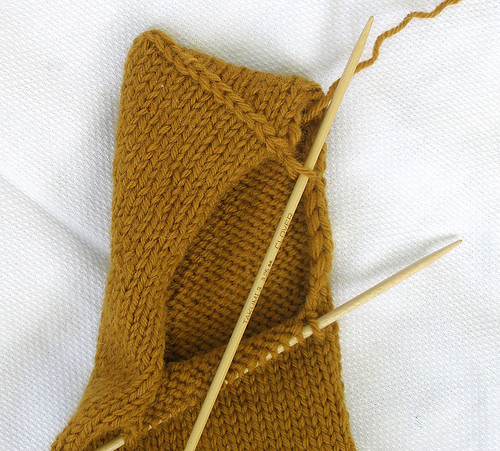
Re-arrange the stitches on your needles: take the 14 stitches before the marker, the marked stitch itself, and the 14 stitches after your center back marker and put all these on one needle (29 sts in all). Take a blunt needle and thread and run it through all the remaining 19 stitches for the instep. Tie the thread ends together and remove the knitting needles from these 19 stitches so you can work the heel flap on the others.
Instructions for heel
Knit back and forth on the 29 stitches to make a flat piece (knit across, purl back). Work until the heel flap is as long as it is wide — about 35 rows. It’s helpful, but not necessary, to slip the first stitch of each row and purl the last stitch (in both directions).
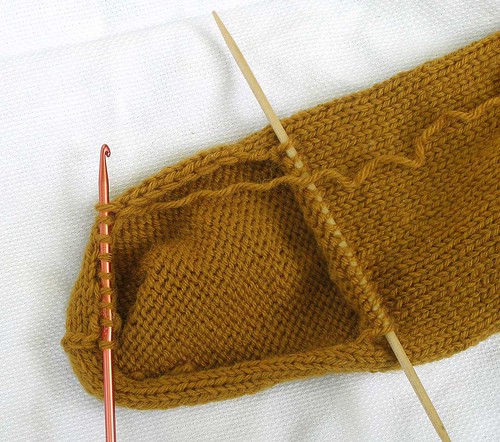
When it’s long enough, slip half the stitches onto another needle and fold the flap in half vertically (wrong sides together) so the two needles are parallel.
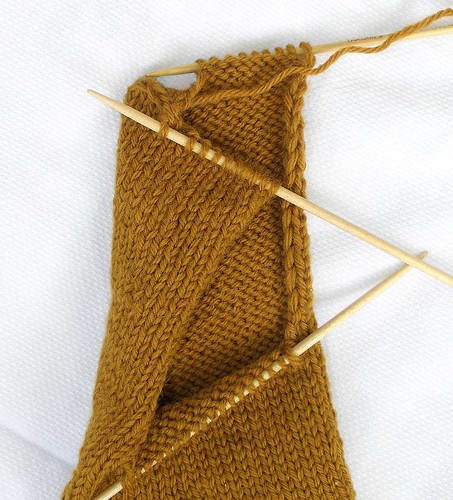
Weave or sew these two rows of stitches together for the seam on the bottom of the heel (it helps to start from the closed end). You can also bind off pairs of stitches together as shown here -- one from the front needle, one from the back.
The start of this seam at the open end is your new “center back” stitch, so mark it (it’s actually the bottom of the foot, now). Put the 19 instep stitches back on your needles and remove the thread holding them. Pick up stitches around the heel (about one new stitch for every two rows of the heel flap) to make a complete round. Mark the first and last instep stitches.
Knit one round plain. On the next round, starting at the center back marker, K until you are one stitch before the first instep marker and K2 together. Knit plain across the instep until you reach the second instep marker and SKP (Sl 1, K 1, psso).
Repeat, decreasing every other round, until you are back at 48 stitches total.
Try it on to be sure this is the right diameter for your foot.
Knit plain for the foot until the sock reaches to the ball of your foot, then begin
the toe decreases.
Instructions for toe
Mark the 12th stitch before and the 12th stitch after the center back stitch. This is where you’ll do the toe decreases.
Decrease round: Knit 2 together with the two stitches before your marker. Knit 1. With the next two stitches, work a SKP decrease (slip 1, knit 1, pass slipped stitch over, or whatever your favorite method is for this).
Knit 2 rounds plain. (44 sts)
Decrease as before, then knit 2 rounds plain. (40 sts)
Decrease as before, then knit 2 rounds plain. (36 sts)
Decrease as before, then knit 1 round plain. (32 sts)
Decrease as before, then knit 1 round plain. (28 sts)
Decrease every round for five rounds (24, 20, 16, 12 and 8 sts).
Cut the end of the yarn, leaving a foot or so, and thread it through these 8 stitches. Pull tight and fasten off.
Copyright 2008 by Chris Laning
This pattern may be freely distributed for nonprofit educational purposes as long as this copyright notice is included. The author would be pleased to hear that it is being used. For details of this Creative Commons license see: http://creativecommons.org/licenses/by-nc-nd/2.0/


4 comments:
These are great instructions for making stockings. I made myself a pair of knee socks based largely on the "Do what seems right, try it on and rip back if need be to make it fit" rubric and it works nicely. I haven't tried your instructions yet, but they are in much the same spirit and I agree that people should try to be braver knitters.
Just finished my first stocking, using this pattern, and it worked pretty well.
Several of us have tried it on, and we all want the next one to be longer (to allow for a turned-over cuff). We're also, collectively, not sure if we like the really distinct "point" that forms coming off the heel (because of the right angle).
I did wonder, in the heel section, why you suggested perling the last stitch in each row (never run across that before), and why you wanted an uneven number of stitches (29, IIRC) for the heel flap--I used a 3-needle bind-off (sort of) to do the "seam," and found myself with an awkward, left-over stitch. Why the odd number?
People who have tried these on don't seem to think the "point" at the back of the heel is a problem. It looks a bit odd to modern eyes, but in practice you don't feel it. By the 16th century, many sock flaps were somewhat shaped to round the heel a bit.
I suggest slipping the first stitch in the row and purling the last because it makes a nice "braided" edge on the flap. This makes it easier to pick up 1 stitch per 2 rows for the instep. I find picking up from a stockinette edge rather frustrating.
The odd number of stitches is (1) so that you will have a center stitch to mark, to help keep track of the shaping later, and (2) so that when you finish binding off the bottom of the heel you have the one central stitch still on your needle, ready to proceed. This means you can work the entire stocking with one unbroken thread. Both of these are matters of taste -- I happen to like both features, so I wrote them in.
Impressive edition! The author had discussed a little bit different technique to manufacture Stockings which are being offered to us by this firm. Today, several online dealers are available to us who are trading in such kind of profession.
Post a Comment